Thursday, August 5, 2010

2 layer Poke cake


This cake is so delicious and one of my favorites! The nice thing about it is that it's a light dessert for those hot summer nights. Heres the Recipe:

INGREDIENTS

2 baked 9-inch round white cake layers, cooled
2 cups boiling water
2 pkg. (4 serving size) JELL-O Brand Strawberry Flavor Gelatin
1 (8 ounce) tub COOL WHIP FREE Whipped Topping, thawed
Directions

Place both cake layers, top-sides up, in clean 9-inch round cake pans. Pierce layers evenly with large fork at 1/2-inch intervals.
Stir boiling water into dry gelatin mix in medium bowl at least 2 minutes until completely dissolved. Pour evenly over cake layers. Refrigerate 3 hours.
Dip one of the cake pans in warm water 10 seconds; unmold onto serving plate. Spread with about 1 cup of the whipped topping. Unmold second cake layer; carefully place on first cake layer. Frost top and side of cake with remaining whipped topping. Refrigerate at least 1 hour or until ready to serve. Decorate as desired. Store in refrigerator.

The best part is that you can use any flavor of gelatin you want! The original recipe used black cherry sugar free but I changed it to regular strawberry.
Have fun and get creative! :)

Tuesday, July 13, 2010

Dress or top?

I needed a new dress for Kailynn and it needed to be quick and easy. So I did a search and came up with this adorable peasant top thatI fell in love with. Why not just make it longer to become a dress? Its from an awesome site called "Make your own baby stuff". How cool is that? Love it! You've got to check it out.

Here's the link to the pattern and Instructions:

Peasant Top

The only thing I did different was to extend the length to make it a dress. I had some discount jersey material from the craft store and it was perfect for a soft little dress for playtime! :)

Heres what I came out with:


***Notice the tiny grabby hand ;) She just couldnt wait to try it on!


That's the best part, seeing my baby girl in it! She's such a ham! :)
Have fun making it, whether its a dress or top. You could make several of them for those simple "go-to" outfits.

Saturday, July 3, 2010

Takeout from home, anyone?


These recipe's are a new favorite of ours whenever we are in the mood for chinese-ish. The chicken is adapted from a "japanese chicken wing" recipe and I changed up some of the ingredients to make it more to our taste. The crab rangoon is a "no fry" recipe but I tried baking them and they didnt taste as well, so now we are unhealthy and I fry them :)

Take Boneless Chicken Breast and cut into chunks about the size of a ping pong ball. Dip them in egg,then flour, then toss them in a frying pan with a little bit of butter or margarine on medium high heat.


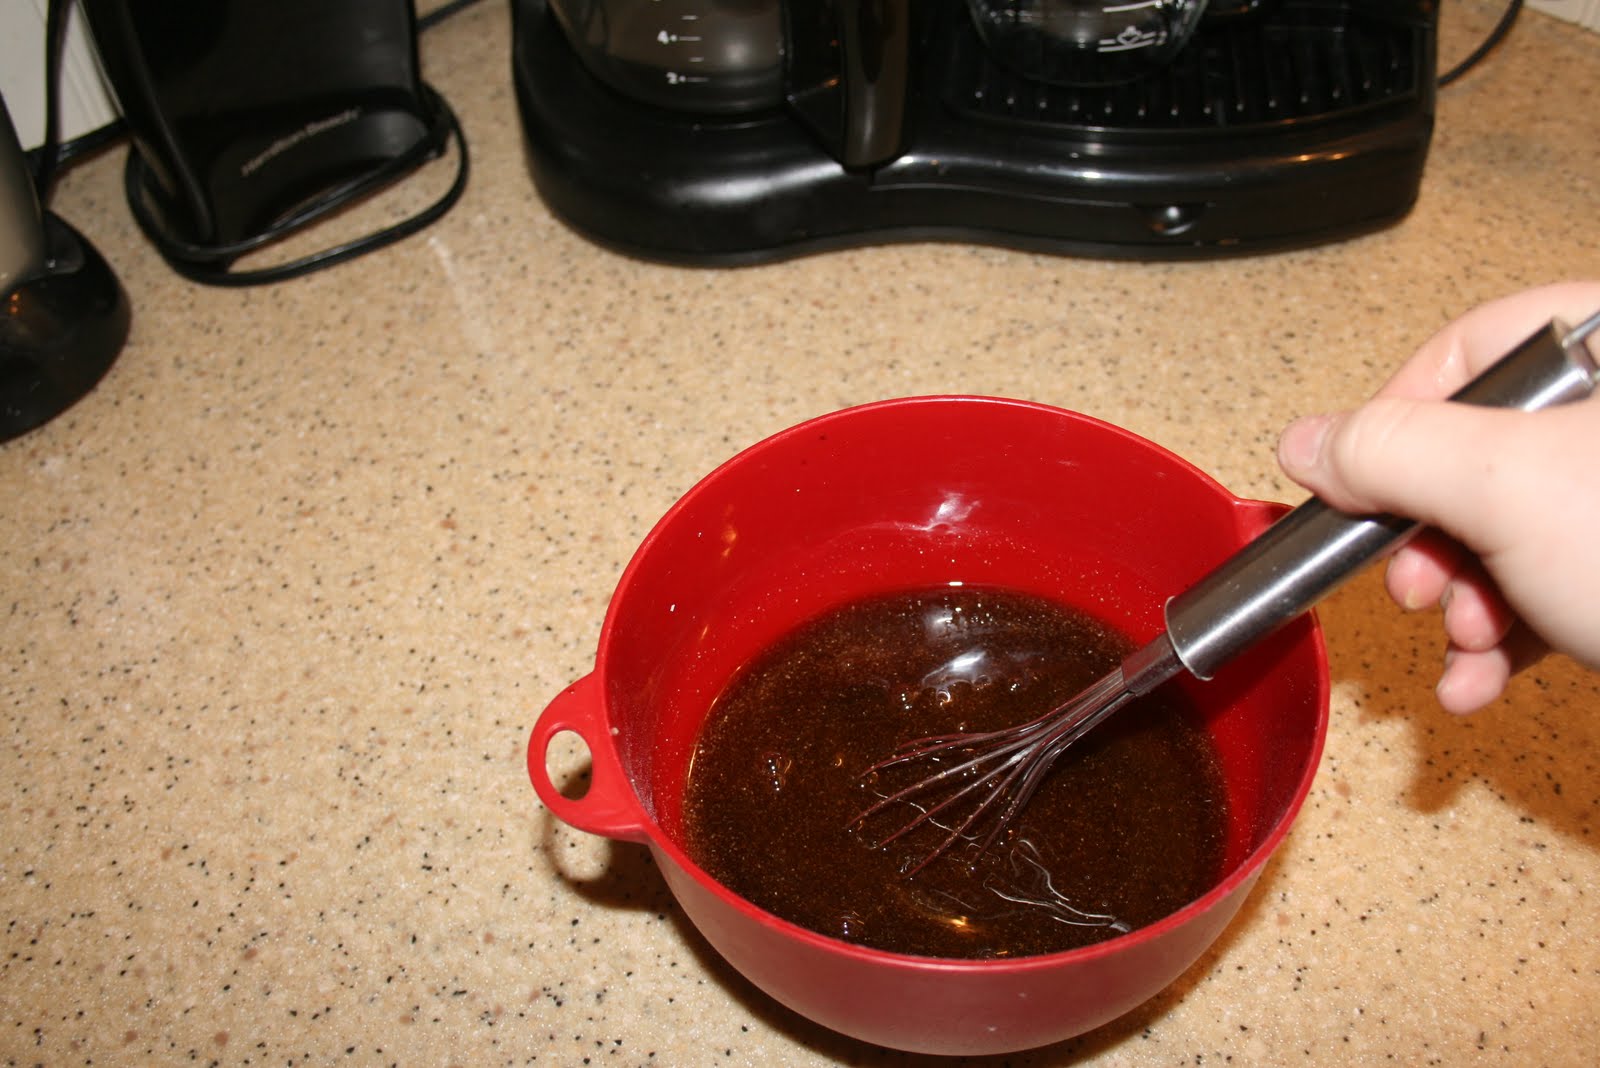
While thats frying(occasionally rotate them so they brown evenly) you can mix up the sauce.Stir it with a whisk, it combines the ingredients much better than a spoon.


After the chicken is evenly a crispy golden brown just throw it in a casserole dish or shallow roasting pan,pour the sauce on top, and stick it in the oven for 30-45 minutes until chicken is cooked thoroughly. Its beneficial if you turn the chicken at least once while its cooking just so you can coat it again with the sauce.


So easy and soooo delicious!! We are very picky about our chinese or japanese food and it always is a bummer when you go out to eat at a new restaurant and you end up hating the food. I was skeptical about trying this but I figured I'd give it a shot. SO glad I did!

Now for the crab rangoon.
Just mix all ingredients together in a medium sized bowl.


Now get a tiny bowl or cup of warm water or egg whites. you will need this to help keep the rangoons closed otherwise the mixture will seep out while they're frying.
Place about a teaspoon sized dallop in the middle of your wonton wrapper. Make sure you keep your wonton wrappers covered while you work with each one, or they will dry out.
Dip your finger in the water or egg whites and wipe along the edges of the wonton wrapper then pinch closed. You can either do them in a triangle shape or a gathered "pocket".


The triangle shaped ones are my first batch that I baked. We didnt care for them as much because some parts were kind of "gummy" and other parts were hard. The next batch I fried in vegetable oil over medium high heat. It only took a few seconds for each one to brown so dont put too many in at once or they'll burn!
Heres what the fried ones looked like.


These were exactly what we wanted. :)
So thats it! Serve it with a side of rice if you like. We had chicken flavored rice.

Here are the ingredient Lists.

Japanese Chicken

1 1/2 to 2 pounds boneless chicken breasts
1 egg, lightly beaten
1 cup all-purpose flour for coating
1 cup butter for frying pan

SAUCE
2 1/2 tablespoons soy sauce
3 tablespoons water
1 cup white sugar
1/2 cup white vinegar
1 teaspoon garlic powder, or to taste
1 teaspoon salt

*Oven Temperature-350 degrees*


Crab Rangoon

2 (8 ounce) packages cream cheese, at room temperature
1/4 cup sour cream
1 tablespoon garlic powder
2 tablespoons white sugar, or to taste
1 package imitation crabmeat, flaked
1 package wonton wrappers
*This recipe makes A LOT. So if you're serving 4 people or less I suggest making half of this recipe. Either that or refrigerate any mixture you dont use for later.

Enjoy it!!

Friday, July 2, 2010

Quick and Easy Tutu


I've been dying to make my daughter Kailynn(AKA Buggy) a tutu for a long time, and she's finally "walking" around coffee tables and crawling all over the place. It's time for a tutu!
Lately we have been so busy with our new home that I decided to find a quick way to make one with minimal sewing. It was super easy and turned out so cute!
Keep in mind, I did not come up with this idea, there are tutorials everywhere for it and who knows who actually invented it. Anyway,this is my tutorial for you.

Here's what you'll need:
-Tulle *I purchased the rolls of tulle at Joann's for 2/$5
-Elastic
-scissors
-measuring tape
-peice of cardboard cut to the length you want your tutu to be * I just used a flap from an old cardboard box we had sitting around


So first, wrap both rolls of your tulle around the cardboard length-wise until its all used up.


Then you cut ONE side.


Next Step, Measure your baby girl's waist. Good luck with that. Mine wiggled and crawled desperately to get away. What a horrible mommy I am ;) The length of your elastic should be the circumference of your child's waist plus 1/2 inch.


Sew your elastic together so that the part that overlaps is the 1/2 inch. You'll end up with a circle that is the circumference of baby's waist.

Now to assemble. You'll need a book or any object that you can stretch the elastic over.
Fold a piece of tulle in half so that the ends match up, then tuck the loop of tulle under the elastic, take the ends of the tulle and poke them through the loop and pull tight. If that sounds confusing , here a a couple of pictures.


Push the strands together,but not too tightly. You can do the pattern any way you like. I did 2 Yellow,2 Pink
After a few, you'll start to get something like this.


And here it is all finished!


This tutu is so fun, and you can make it any color you want, a single color or 5 different colors! Your little princess or ballerina is going to love it no matter what, and it wont even take you very long to do!
You could also make a few for gifts. Any little girl would be lucky to receive this one-of-a-kind,fun present.

Buggy wasnt sure about hers at first but then she warmed up to it.


So have fun with it, go crazy! Send me a pic if you make one yourself. I'd love to see :)

Thursday, June 24, 2010

Changeable Wreath


This wreath is so fun to do and super easy! And you wont believe what its made from. Brown Paper bags! Im sure you have some of those laying around, but if you dont,head over to the dollar store. Thats where I bought mine! And while you're there buy the rest of the supplies if you dont already have them on hand. Here's what you'll need.

-Brown paper bags
-Scalloped circle punch(I used scalloped edged scissors)
-foam wreath
-unsharpened Pencil
-Hot Glue Gun
-Cardstock and book pages for the butterflies

***I first learned how to make this from MaryJanesandGaloshes
so all credit goes to her! I just love passing these things on. She explains it so well.

Directions:

-Cut out a TON of scalloped circles. Theres no set number because I used way more than the original directions said. I guess it depends on how close you decide to space them.Also if you can get a punch for this part,go for it, because using the scalloped edged scissors worked great but it took forever and you get sick of it. So try to get ahold of a punch,even if you just borrow it!

-Press your pencil into the middle of a circle and twist so that it folds up to look like a flower. (pictured below)


This Photo is from Maryjanesandgaloshes.com

-Hot glue each "flower circle" to the wreath close together so that you dont see any of the white wreath underneath.Continue until its all covered.

If you like a nuetral wreath just time a big Ribbon around the top to hang it from. Or add the butterflies or whatever else you would like to see on it.

For the butterflies: MJ&G has an awesome template that you can print out and trace onto your paper.
She also has the complete tutorial there which explains every little step.


Here's a picture of my finished creation:

I LOVE it!! But I think I may change the color of the butterflies...hmmm.

The nice thing about this wreath is that you can switch out the butterflies anytime with something else. Whether its holiday related or just to match your decor in your house. You can also use some other kind of paper. Im planning on making one out of scrapbook paper soon. Maybe even a mini-wreath! How cute would that be??


Monday, June 21, 2010

And so it begins...

Hi, Im Jeannie, and Im a Craft-aholic. And a Hobby-aholic. And everything else. I change my mind lot. My husband would say that's an understatement. He says I have a different hobby everyday. He's wrong. It more like every month or so. Anyway, Its not that I stop liking my old hobby, its more like I get bored and if I happen to see something new,I suddenly have a new hobby! It happens like magic,seriously. Im that good. ;)
All of my crafting adventures,good AND bad, have brought me here. Ive spent days and nights looking at all the awesome craft blogs on here and was dying to try pretty much EVERYTHING. But I also found myself trying to change up some of the ways others did things or just wishing the tutorial was described in more depth. Then I thought, "Hey I could do that. I think." And thus this blog was born. Hopefully I can keep it interesting enough to keep everybody's attention,that's just one of my goals! Let me know if you'd like to see anything in particular. Im always up for new ideas. Thanks for reading, and Happy Crafting!

Related Posts with Thumbnails